Hi everyone. It's been a wild week as some of you may already know if you follow my social media. Hubby and I headed up to the Carolinas for my 5 store teaching tour while Hurricane Matthew headed right for our home back here in Melbourne. Luckily, the storm took a slight enough turn to avoid any major damages here, but unfortunately the storm traveled up the coast and did most of its damage in the form of flooding in areas of North Carolina. Paul and I were safe all of the time on our travels, thankfully, and although I was forced to cancel my first stop at Scrapbooks by the Sea in Myrtle Beach, SC due to early evacuations, I had a great time teaching along the way. Thank you to all those who sent up prayers and positive thoughts while we were away. We are now safely back in our home, and our Suki baby, and back to our routines.
Today I'd like to share a simple and beautiful Fall decor piece you could easily create in just a few hours. I made one similar to this last year with a different twist. Check it out at this link.
My project started with a wooden photo frame from my local craft store.
(Frames are 50% off this week at Hobby Lobby.) As you can see, the frame has a dull finish of a light, grayish color. After popping out the glass and the backing, I painted the frame with a thin layer of Ground Espresso Distress Paint. Once dry I added a light layer of Antique Bronze Distress Paint, applied in light, sweeping strokes. (see first photo, above)
After cleaning the glass, I stamped fall leaves with Staz-on (Timber Brown) ink and set it aside to dry.
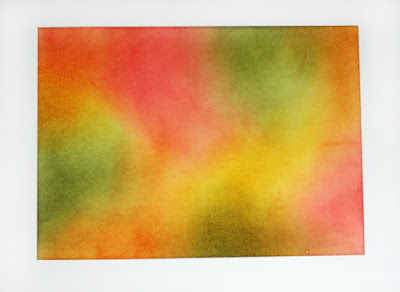
Onto Ranger's Mixed Media Cardstock cut to fit into the frame, I blended Fired Brick, Forest Moss, Rusty Hinge and Wild Honey Distress inks with a blending tool.
After blending the inks I spritzed and dribbled water drops onto my colors and let them sit. After a few minutes, I heat set it with my Heat-it Craft Heater.
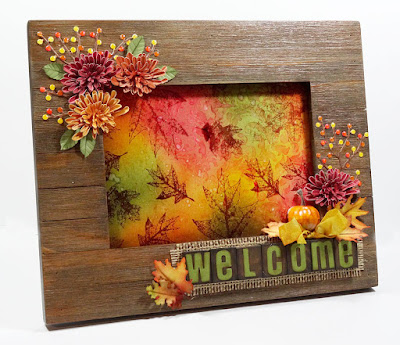
Finally, I spritzed a large background stamp with fine mists of water and pressed it onto my piece, letting it sit for about 10 seconds before lifting it. This allowed time for the water on the stamp to activate with the Distress Inked background. I LOVE this effect.
Once the colored background was completely dry, I inserted it back into the frame behind the glass and then decorated my frame's front using Susan's Garden Notes "Chrysanthemum", "Berry Branch" and "Woodland Leaves" dies.
You can view the steps to create the beautiful Chrysanthemums in Susan's video here.
I created small wood blocks to resemble letterpress letter blocks by cutting thin strips of wood, painting them dark brown, and adhering die-cut letters in green cardstock to the fronts. The blocks were then adhered to the frame over a piece of frayed burlap. A small pumpkin and a bow fill the lower right corner of the frame to balance everything out. (click on the photo for a closer look.)
Thanks for stopping in today. I hope you enjoyed the project. I'd love to hear if you make Fall decor pieces for your home.


It sounds like a pretty scary time, but glad that you and your home got through it all OK! The frame is beautiful, I love that technique that leaves a ghostly image and the stamped leaves on the glass look fabulous. The flowers are such a wonderful finishing touch too. xx
ReplyDeleteThis is beautiful, Annette! Glad you and Paul were safe during Matthew and that you are now back home with Suki.
ReplyDeleteHad to hop right over and make a card with this idea for my class tomorrow. You are an inspiration!
ReplyDelete